Top Producer makes it easy for you to create new activities by allowing you to add them from a number of different locations. The two most common ways of creating a new activity are:
- From the Calendar main menu icon
- From an existing record, such as a contact, listing, or closing
Creating an Activity from the Calendar Main Menu Icon
One of the easiest ways to create an activity is by clicking the Add Activity link from the Calendar landing page, or by selecting the Add Activity submenu item from the Calendar main menu icon. The Add Activity form has a number of segments used to organize the activity information.
-
Activity Type segment: Choose the type of activity you want to create from the drop-down list.

Activity types are divided into two categories. Timed activities must be performed on a specific date and time, such as appointments. Only appointments appear on calendar views. Untimed activities must typically be performed before a certain date or date range. To-dos, calls, and correspondence items such as emails, letters, envelopes, and postcards fall into this category.
-
Activity Details segment: Fill in as much detail as possible.
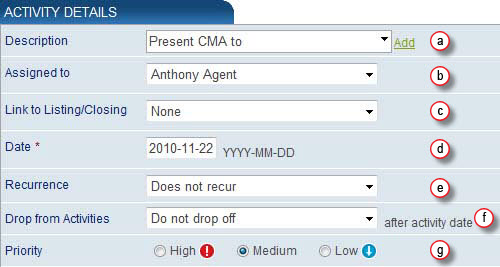
Tip: Any fields with an asterisk beside the field name are required and must be filled in before the record is saved.
-
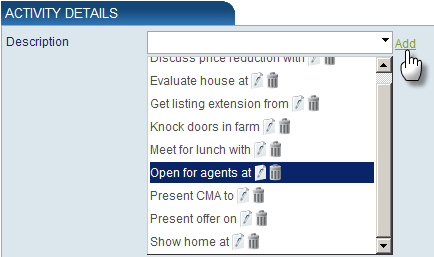
Description field: Make sure the description is detailed enough for you to know what the activity is about. It will make it easier for you to locate it on the Calendar. You can create your own list of commonly used descriptions by clicking the Add link, and then access them through the drop-down list.
- Assigned to drop-down list: The activity is automatically assigned to the person creating it, but you can reassign it to an assistant or team member by clicking on the drop-down list and selecting another person’s name.
- Link to Listing/Closing drop-down list: Select a listing or closing file to link to the activity. The saved activity appears on the Activities tab of the selected file.
- Date field: You can either click in the field to select a date from a calendar, or type in a date.
-
Recurrence drop-down list: If you’d like to set a recurring activity, such as a monthly team meeting, click on the drop-down list and choose the interval the activity will occur. This opens a form within the Activity Details segment for you to complete:
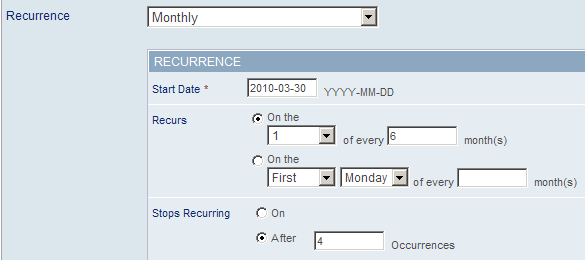
Choose the date when you’d like the recurring activities to start, decide how they’ll recur and when they should end.
- Drop from Activities: Select how many days the activity will continue to appear on your Calendar or the Calendar landing page after it’s been scheduled. Top Producer defaults the activity to never drop off, but you can change this so it appears for up to 90 days after the scheduled date. When the specified number of days after the due date is reached, the activity no longer appears on your schedule.
- Priority option buttons: Determine how important the activity is.
Options Available when Creating an Appointment
If you’re creating an appointment, a Time field displays for you to specify the start and end time. If you’ve linked the activity to a listing or closing, you can auto-adjust the activity’s completion date based on the closing or acceptance date for a closing, or the listing or expiry date of a listing.
You will also have the option to create an appointment reminder that will notify you a specified amount of time before the appointment becomes due. For more information, read the Activities Reminders article.
-
-
Contacts segment: Link the activity to a contact by selecting a contact from the Contacts Look-up portlet and dragging and dropping it anywhere on the Contacts segment. The contact then shows as a linked field.
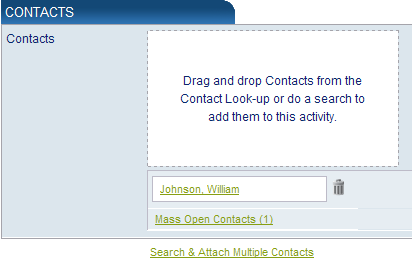
You can search for and link multiple contacts to the activity by clicking the Search & Attach Multiple Contacts link.
-
Template segment: This segment only appears if you’re creating an email, letter, envelope, label, or postcard activity type.
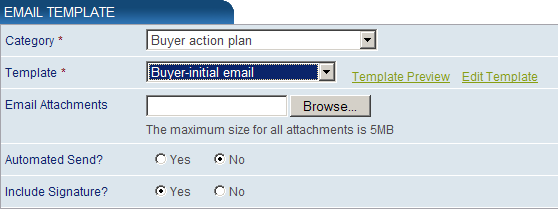
You must select a template category and a template. For emails you have the option of attaching a file, sending it automatically, or including your signature.
Tip: Click the Template Preview link to open a preview of the generated email, letter, envelope, label, or postcard with sample data on a separate Internet browser tab. Click the Edit Template link to make changes to the selected template for this activity only. Once you save your changes you’ll see a message beside the Template field letting you know you’re now using a modified version of the selected template.
- Notes segment: Add any relevant activity details. Any additional information you add here appears in the Notes section of the saved activity.
- Add Activity form buttons: There are 3 form buttons.
- Add Activity: Saves the activity and takes you to the Activities Summary page.
- Save & Add Another: Saves the activity and opens another Add Activity form
- Cancel: Discards your changes and takes you to the Activities Summary page.
- Add Activity action links: Depending on the type of activity you’ve created, there are normally 4 links available.
- Send: For email activities, clicking the link sends the email to the selected contact(s) and takes you to the Activities Summary page.
- View: For correspondence activities (emails, letters, envelopes, labels, postcards), the generated previews open using the Mass Open toolbar. You can scroll through each correspondence and use the word processing tools to make edits and save your changes.
- Print Preview: Opens a preview of the generated correspondence in PDF format for you to print or save. For letters you have the option of printing out envelopes and labels.
- Mark Done: Once the activity is completed mark it done to remove it from the Activities Summary page, or if you no longer need to complete the activity.
Creating an Activity from a Linked Record
You can also create an activity from an open contact, listing, or closing record. An added benefit of adding an activity this way is it’s automatically linked to the record from which it was created.
- From an open record, go to the Activities tab.
- Click the Add Activity link to open an Add Activity form. You’ll see the contact record, or contact associated with the listing or closing record, is already linked to the activity.
- Enter the activity details and click the Add Activity button to save your changes.
- The new activity is listed on the Activities tab.
